Fastlane으로 Flutter 빌드 및 배포 자동화 환경 구축하기
— 1 min read
🤔 Flutter에서 iOS 앱을 TestFlight에 배포하려면?
$ flutter build ios로 릴리즈 빌드 생성. (기다림 필요...)- version과 build number를 올림.
- Xcode에서 Archive. (기다림 필요...)
- AppStore Connect에 Distribute. (기다림 필요...)
- TestFlight에 빌드가 올라가면 슬랙으로 공유.
기존 배포 방식은 오래 기다려야하고 너무 귀찮다!! 😫
하루에 몇번씩 배포를 하다보니 빌드와 배포 자동화 필요성이 절실해져서 Fastlane을 도입하기로 결심했다.
Fastlane은 iOS App과 Android App 빌드와 배포를 자동화 시켜주는 오픈소스 툴이다.
기본적인 Fastlane 사용방법은 Flutter 공식 fastlane 문서에 정리되어 있다.
나의 목표는 다음 2가지였다.
- 개발 운영 환경 변수 잘 관리하기(Production, Staging and etc...)
- 릴리즈 빌드를 뜨는 것(flutter build ios)까지 자동화에 포함하기
🌏 환경 변수 설정하기
fastlane은 env파일로 환경 변수를 관리할 수 있다.
fastlane 디렉토리에 있는 .env 파일에는 공통으로 사용하는 부분을 명시해주면 된다.
.env
1SLACK_URL="your-slack-webhook-url"2APPLE_ID="your-apple-id"우리 회사의 경우에는 각자의 애플 계정을 사용하고 있기 때문에 Apple Id도 env 파일에서 따로 관리하도록 했다.
운영 환경 파일은 Production용 .env.live 와 Staging용 .env.testbed를 생성했다.
- slack 메세지를 보낼 때 사용할 이모지
- 환경 변수 이름
- 릴리즈 빌드 시에 사용할 main 경로
.env.live
1ENV_EMOJI="🔵"2ENV="Live"3MAIN_TARGET="lib/main_live.dart".env.testbed
1ENV_EMOJI="🟠"2ENV="Testbed"3MAIN_TARGET="lib/main_testbed.dart"환경 변수를 불러오려면 ENV["변수명"] 으로 불러오면 된다.
ex) ENV["ENV_EMOJI"] , ENV["MAIN_TARGET"]
아래는 환경변수에 맞게 TestFlight 배포를 하는 beta lane이다.
1desc "Push a new beta build to TestFlight"2 lane :beta do3 # Fetching the latest build number from TestFlight4 increment_build_number(5 build_number: latest_testflight_build_number + 1,6 xcodeproj: "Runner.xcodeproj"7 )89 # 배포 시작 시 슬랙 메세지 보내기10 send_slack_message(msg: "💫 TestFlight 배포를 시작합니다.")1112 # Flutter build iOS - 설정한 환경변수에 맞는 main으로 빌드13 # (이 lane에 대한 설명은 아래에 있습니다.)14 flutter_build_ios1516 # Build app17 build_app(workspace: "Runner.xcworkspace", scheme: "Runner")1819 # Upload to testflight20 upload_to_testflight2122 # Send slack message23 send_slack_message(msg: "🚀 Successfully distributed a new beta build ✨")24 end 2526 # Send slack message27 lane :send_slack_message do |options|28 version = get_version_number(xcodeproj: "Runner.xcodeproj")29 build_number = get_build_number(xcodeproj: "Runner.xcodeproj")30 slack(31 message: options[:msg],32 payload: {33 "Version" => :version,34 "Build" => build_number,35 "Environment" => "#{ENV['ENV_EMOJI']} #{ENV['ENV']}"36 },37 )38 endfastlane 커맨드 실행 시에 --env 옵션을 사용하면 환경 변수를 선택할 수 있다.
1$ fastlane [lane 이름] --env [환경변수 파일 이름]2$ fastlane beta --env live3$ fastlane beta --env testbed🚀 자동화에 릴리즈 빌드 생성 작업 포함하기
와 자동화 환경 다 만들었다!!😆
라고 생각했지만.. 우리는 Flutter를 사용하고 있기 때문에 릴리즈 빌드 생성 단계까지 포함해서 아래와 같은 커맨드 라인을 실행해야했다.
$ flutter build ios로 릴리즈 빌드 생성$ cd ios$ fastlane beta --live
이러면 자동화를 한 의미가 무색해지기 때문에 이 부분도 fastlane 실행 시에 포함하기로 했다.
FastFile에서 sh를 사용하면 터미널 명령어를 실행할 수 있다.
아래는 flutter build ios를 실행하는 lane이다.
1default_platform(:ios)23platform :ios do4 # Flutter build iOS5 lane :flutter_build_ios do6 # ios 디렉토리에서 cd ..로 프로젝트 root 경로로 이동한다.7 sh("cd", "..")8 9 # flutter clean 실행10 sh("flutter", "clean")11 12 # flutter build ios로 릴리즈 빌드를 생성한다.13 # -t는 main 경로를 지정해주는 옵션이다.14 # 여기서 ENV['MAIN_TARGET']은 "lib/main_live.dart"이다.15 sh("flutter", "build", "ios", "--no-codesign", "-t", ENV['MAIN_TARGET'])16 end17end결과
FastFile 전체 코드
1# This file contains the fastlane.tools configuration2# You can find the documentation at https://docs.fastlane.tools3#4# For a list of all available actions, check out5#6# https://docs.fastlane.tools/actions7#8# For a list of all available plugins, check out9#10# https://docs.fastlane.tools/plugins/available-plugins11#1213# Uncomment the line if you want fastlane to automatically update itself14# update_fastlane1516default_platform(:ios)1718platform :ios do1920 desc "Push a new beta build to TestFlight"21 lane :beta do22 23 # Fetching the latest build number from TestFlight24 increment_build_number(25 build_number: latest_testflight_build_number + 1,26 xcodeproj: "Runner.xcodeproj"27 )2829 send_slack_message(msg: "💫 TestFlight 배포를 시작합니다.")3031 # Flutter build iOS32 flutter_build_ios3334 # Add badge to app icon (only testbed)35 add_badge_to_icon3637 # Build app38 build_app(workspace: "Runner.xcworkspace", scheme: "Runner")3940 # Upload to testflight41 upload_to_testflight4243 # Send slack message44 send_slack_message(msg: "🚀 Successfully distributed a new beta build ✨")45 end 4647 # Send slack message48 lane :send_slack_message do |options|49 version = get_version_number(xcodeproj: "Runner.xcodeproj")50 build_number = get_build_number(xcodeproj: "Runner.xcodeproj")51 slack(52 message: options[:msg],53 payload: {54 "Version" => :version,55 "Build" => build_number,56 "Environment" => "#{ENV['ENV_EMOJI']} #{ENV['ENV']}"57 },58 )59 end6061 # Flutter build iOS62 lane :flutter_build_ios do63 sh("cd", "..")6465 puts "Flutter clean"66 sh("flutter", "clean")6768 puts "Flutter build iOS"69 sh("flutter", "build", "ios", "--no-codesign", "-t", ENV['MAIN_TARGET'])70 end71 72 # Add badge to app icon73 private_lane :add_badge_to_icon do74 if ENV["ENV"] == "Testbed"75 add_badge(alpha: true, dark: true)76 end77 end78 79 # Error handling80 error do |lane, exception|81 slack(82 message: "😱 "+exception.message,83 success: false84 )85 end86end이제 command line 한 줄만 실행하면 배포에 필요한 모든 과정을 실행할 수 있게 되었다!
1$ fastlane beta --env live2$ fastlane beta --env testbed🥳 Fastlane으로 배포 성공!

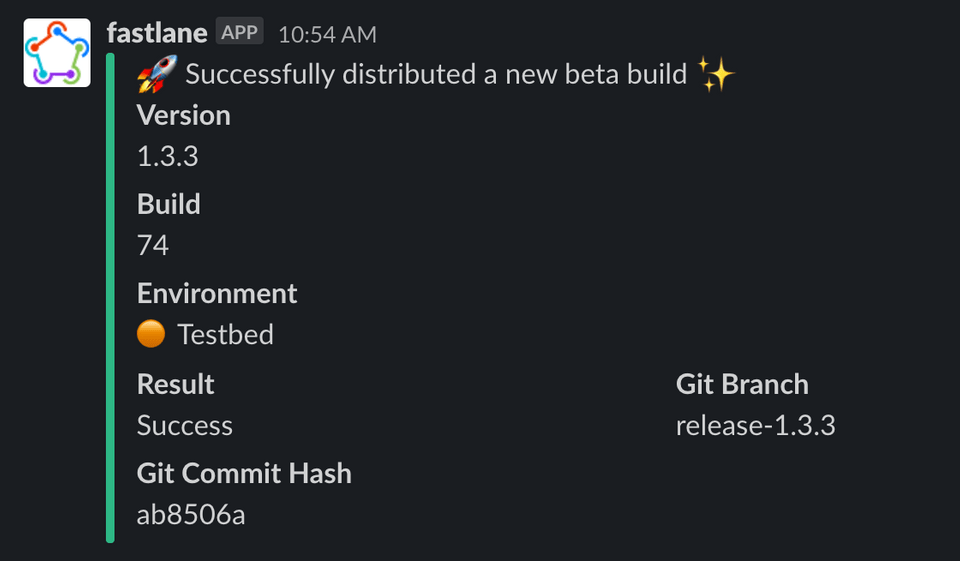
TestFlight에 배포가 되면 이렇게 슬랙 메세지가 날아온다!
![]()
그리고 testbed인 경우에는 badge로 앱 아이콘에 alpha 뱃지를 달아주도록했다.
그동안 개발 운영 환경에 따른 다중 빌드와 flutter build에 고통받았었는데 광명을 찾을 수 있었다. Fastlane은 알면 알수록 재밌고 신기하고 좋은 기능도 많다. 좀 더 공부한다면 업무 효율성을 효과적으로 높일 수 있을 것으로 기대한다. 다들 츄라이 츄라이해보시길!
혹시 틀린 점이 있다면 댓글로 알려주시면 정말 감사하겠습니다.😄